Printer Installation (J1 RS-232)
A Liquid Controls meter system with a Register typically includes an Epson slip printer or roll printer. The installation is the same for either printer.
See instructions in Routing Data and Power Cables for routing the data cable from the back of the truck to the cab.
Disconnect Power |
Disconnect the power before working on the. CPU board. |
To wire a Printer to the Register:
1.Go to to Main Menu / Setup Menu / Register Settings (3/3) - Printer Type. Ensure proper printer is selected in the drop down selection field.
2.Attach cable glands and/or conduit connectors to the Register port. Make sure to use thread sealant on NPT threads.
3.Connect the wires to the J13 and J14 terminal blocks of the Register board.
•GND / Black to terminal 80
•CTS / Blue to terminal 81
•RXD / Yellow to terminal 82
•TXD / Orange to terminal 83
•RTS / Brown to terminal 84
•RTS / Red to terminal 92
•TXD / Violet to terminal 91
•RXD / Gray to terminal 90
•CTS / Green to terminal 89
•GND / White to terminal 88
Routing Data Cables |
See the instructions on Routing Data and Power Cables for routing the data cable from the back of the truck to the cab. |
To install the printer:
1.Mount the printer in the truck cab where drivers can easily operate it.
2.Clean the mounting spot and the bottom of the printer with alcohol for the best adhesion.
3.Attach Velcro to the mounting area and the bottom of the printer. Fasten the printer to the mounting area.
4.Connect the data cable to the RS-232 data port on the back of the printer.
Connecting Power |
To connect power to the printer, see Power Supply. |
Epson Printer Ground Wire Kit Installation
Before connecting power to the Register and the Epson printer, ground the printer to the truck cab floor. Epson printers sold for truck installations are all grounded in the same manner.
- 82184 - Epson Printer Ground Wire Kit |
|||
# |
Description |
Part Number |
Quantity |
1 |
Ground Wire |
84101 |
1 |
2 |
Terminal (.375 ring, 16GA) |
71878 |
1 |
Follow these steps to ground an Epson printer:
1.Remove one of the mounting bolts that fasten the printer mounting brackets to the truck cab floor.
2.Place one end terminal of the ground wire over the mounting bolt and return the bolt to its original place.
3.At the back of the Epson printer, remove the silver ground screw marked “FG”.
4.Place the other end terminal of the ground wire over the ground screw and return the screw to its original place.
5.Check the strap for a good ground connection (see page 13).
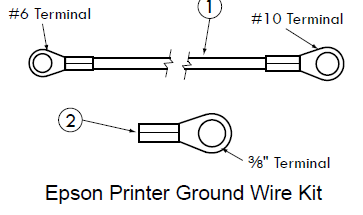
Additional Terminal |
The Epson Printer Ground Wire Kit contains an additional ⅜" ring terminal for printer brackets that are not purchased from Liquid Controls. |